Best Acoustic Foam Panels for Home Office Soundproofing
The proliferation of remote work has elevated the importance of acoustic management within residential environments. Unlike commercial corporate spaces built with specialized sound-isolation infrastructures, standard residential rooms feature parallel, hard drywall surfaces, uncarpeted floors, and minimal soft mass. When an individual conducts video conferences or voice calls in an untreated room, vocal sound waves bounce off these boundaries, producing flutter echoes, hollow reverberations, and muddy audio profiles that strain listeners on the other end of the line.
To address these acoustic distortions, professionals regularly turn to surface-mounted treatments to dampen internal reflections. Exploring the utility of the best acoustic foam panels for home office soundproofing reveals a critical intersection between physical chemistry, room geometry, and audio clarity. This comprehensive guide serves as an objective reference for architectural treatment options. Readers will learn the underlying mechanics of sound dampening, differentiate between true noise blocking and internal absorption, analyze practical workspace scenarios, and establish structural upkeep routines to achieve pristine audio transmission.
Overview of Best Acoustic Foam Panels for Home Office Soundproofing
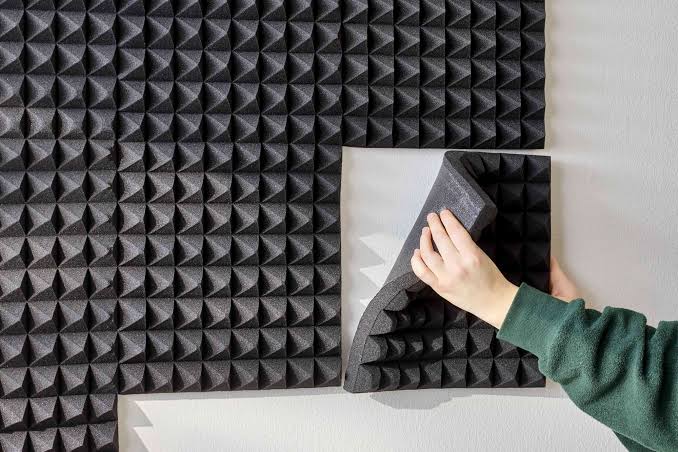
To build an optimized acoustic workspace, one must address a prevalent industry misconception regarding the best acoustic foam panels for home office soundproofing. In architectural acoustics, soundproofing (blocking sound from passing between separate rooms) requires dense, heavy structural materials like mass-loaded vinyl, double-stud drywalls, or solid-core doors. Sound absorption (controlling sound reflections and echo inside a single room) relies on open-cell porous materials. Lightweight acoustic foam panels function exclusively as an absorption mechanism; they convert bouncing kinetic sound waves into low-level thermal energy via microscopic friction inside their open pores, lowering internal reverberation rather than blocking external family noise.
[Direct Vocal Wave] ---> Open-Cell Foam Matrix ---> Internal Friction ---> Thermal Energy (Absorbed)
[Direct Vocal Wave] ---> Hard Bare Drywall   ---> Elastic Bounce    ---> Flutter Echo (Reflected)
When professionals map out surface treatments, the core objective is to reduce the room’s total reverberation time ($RT_{60}$) to a targeted window of 0.4 to 0.6 seconds. People commonly achieve this by identifying first-reflection points—the precise wall areas where vocal waves hit first after leaving a speaker’s mouth. By strategically placing open-cell panels on bare walls at ear level, users can expect an immediate drop in digital call feedback, greater vocal articulation over standard microphones, and a calmer, quieter workspace that supports focused intellectual work.
Architectural Classifications of Acoustic Foam
Acoustic foam panels are manufactured in distinct physical cuts, open-cell densities, and material compositions engineered to target specific sound frequencies.
Material Metric and Profile Comparison
| Category / Type | Description | Common Use Case | Time / Cost / Effort Level |
| Wedge Profile Panels | Classic linear channels cut into 1-to-2-inch thick polyurethane foam; provides balanced absorption. | General mid-to-high frequency vocal treatment ($500\text{Hz}$–$4000\text{Hz}$). | Budget-friendly; rapid 1-hour wall installation; minimal effort. |
| Pyramid Profile Cuts | Uniform four-sided geometries that scatter remaining sound waves while absorbing early paths. | Multi-screen setups where sound waves hit from multiple desktop speaker angles. | Low cost; simple geometric tiling layout; low manual labor. |
| Thick Corner Bass Traps | Solid, dense triangular blocks designed to slide straight into ninety-degree room joints. | Basement offices or masonry rooms experiencing boomy, low-frequency vocal resonance. | Moderate cost; low installation time; high impact. |
| Compressed Felt Panels | High-density polyester fibers pressed into sleek, thin, geometric flat tiles. | High-visibility modern rooms prioritizing premium interior styling and impact protection. | Moderate to premium cost; clean mounting adhesive; minimal effort. |
Choosing between these structural categories depends on your dominant room reflections and specific hardware setups. If your workspace uses standard desktop speakers and suffers from a bright, echoey ring every time you type or speak, a cluster of 2-inch wedge or pyramid profile panels placed at ear level handles the problem effectively. If your office sits in an enclosed basement with concrete walls where low-frequency vocal tones create a deep, boomy echo, you must prioritize thick corner bass traps to catch long, slow low-end waves where they pool in corner joints.
Practical Workspace Scenarios and Targeted Applications
The physical layout of furniture, doors, and bare drywall shapes the way sound waves bounce around an office. Below are three common real-world installation scenarios.
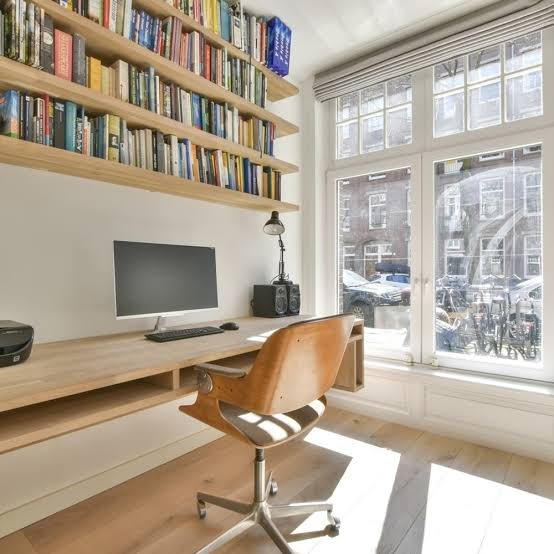
Scenario 1: The Bare-Wall Minimalist Home Office
This scenario features a remote professional operating a standard laptop from a clean, modern room with hardwood floors and zero soft decorations, creating a distinct “bathroom-like” ring during calls.
-
Actionable Layout Steps:
-
Place a thick felt-padded area rug directly under the chair and desk footprint.
-
Mount a checkered $4 \times 4$ cluster of 2-inch wedge foam panels on the wall directly opposite your face.
-
Center the wall cluster at eye level ($48$ to $54$ inches from the floorboard line) to catch direct vocal paths.
-
-
Why Relevant: Hardwood floors and bare drywall function like visual mirrors for sound waves. Placing foam panels directly where your voice travels first stops early echoes before they can bounce between parallel walls.
Scenario 2: The Finished Subterranean Concrete Basement
This environment involves an office built inside a finished basement where the structural walls are painted concrete or heavy masonry behind thin drywall, locking low frequencies in the room.
-
Actionable Layout Steps:
-
Slide dense, triangular foam bass traps into all four vertical corner joints of the room, running them from floor to ceiling.
-
Apply 2-inch thick pyramid foam tiles over at least 30% of the flat drywall surfaces.
-
Use non-destructive, removable adhesive mounting tabs to avoid tearing underlying vapor barrier paint.
-
-
Why Relevant: Low-frequency sound waves travel along wall boundaries and compress tightly inside rigid ninety-degree corners. Bass traps break up this energy, eliminating boomy room resonance.
Scenario 3: The High-Ceiling Multi-Use Loft Space
A professional operates a video studio or workstation inside an open loft with high ceilings, where sound waves travel long vertical distances and create stadium-like echo delays.
-
Actionable Layout Steps:
-
Hang lightweight foam baffles vertically from the ceiling joists using thin steel line clips.
-
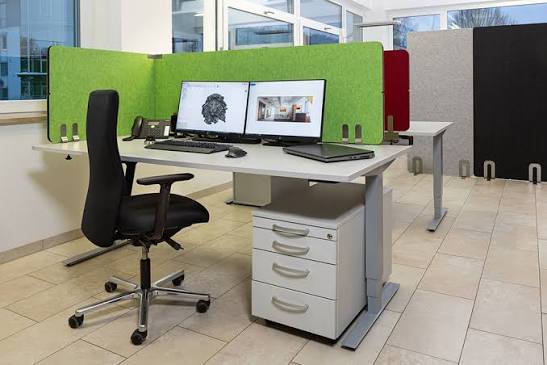
Set up fabric-covered freestanding partition screens directly behind your task chair workspace.
-
Open your digital call configuration app and turn the native background software filtering toggle to “High.”
-
-
Why Relevant: High ceilings make wall panels less efficient because sound escapes upward. Ceiling baffles intercept these rising waves, while partition screens build a quiet local acoustic zone around your microphone.
Contextual Comparison
These setups differ based on their primary reflection geometries. Scenario 1 controls direct, horizontal vocal reflections between parallel walls. Scenario 2 manages deep, compressed low-end frequencies pooling inside rigid corner masonry. Scenario 3 addresses vertical space challenges by using hanging ceiling baffles, showing that optimizing your acoustics requires matching your panels to the physical movement of the sound waves.
Planning, Sourcing, and Financial Estimations
Successfully optimizing an office room requires structured budgeting. Purchasing low-density packaging foam under the guise of an industrial sound filter will fail to catch vocal frequencies, leaving your room echoey. Sourcing panels with independent lab verifications guarantees long-term performance.
Acoustic Surface Treatment Project Budget
| Category | Component Item Examples | Estimated Cost Range | Operational Purpose & Sizing Rule | Optimization Tips |
| Primary Core Panels | 2-Inch Polyurethane Wedge Tiles (24-Pack). | $45 – $80 | Glued or pinned to bare walls to catch mid-frequency reflections ($500\text{Hz}$+). | Look for panels with a verified Noise Reduction Coefficient (NRC) score of 0.70 or higher on the specification sheet. |
| Corner Absorbers | Solid Triangular Bass Traps (4-Pack). | $35 – $60 | Positioned vertically in corner joints to damp low-frequency room boom. | Mount bass traps at the midway vertical point of corners if you cannot afford full floor-to-ceiling coverage. |
| Mounting Hardware | Clear Double-Sided Gel Tape or T-Pins. | $15 – $30 | Secures lightweight foam to drywalls cleanly without tearing paint layers during future removal. | Pinning foam onto lightweight corrugated plastic project boards lets you hang full groups with just two nails. |
| Diagnostic Sizing | Standalone Sound Level Meter or Mobile App. | $0 – $25 | Calculates real-world room echo decay times before and after your panel installations. | Check your room’s echo levels under empty conditions to establish an accurate baseline reading. |
Note: The baseline financial models and material specifications detailed in this guide serve as illustrative consumer market examples for the year 2026. Retail costs can fluctuate based on local material supply chains, density updates, and custom dealer bundles.
Strategic Implementation Tools and Core Methods
Several specialized tools and installation choices help home workers set up their absorption materials securely and efficiently.
1. High-Density Open-Cell Polyurethane Foam
Porous polymer blocks expanded with gas bubbles during manufacturing to create an intricate web of open air pathways.
-
Advantages: Exceptionally lightweight; easy to slice cleanly to any custom shape using a standard electric carving knife; highly cost-effective for wide room coverage.
-
Disadvantages: Prone to yellowing or fading if installed in direct path of sunny windows; cannot block external street noise.
2. Clean T-Pin and Project Board Arrays
A temporary installation method where foam tiles are glued onto a portable sheet of plastic poster board, which is then hung on the wall using small picture pins.
-
Advantages: Protects your home apartment walls from permanent glue damage; lets you pack up and move your entire acoustic array easily if you relocate.
-
Disadvantages: Holds the panels slightly away from the wall surface, which alters the clean, flush aesthetic of your interior design.
3. Compressed Polyester Fiber Tiles (PET Architecture)
Modern sound-absorption tiles manufactured from recycled plastic fibers compressed tightly into rigid geometric shapes.
-
Advantages: High visual appeal with sleek profiles; highly resistant to impacts or tearing; naturally fire-retardant and safe for homes.
-
Disadvantages: Carries a premium entry cost compared to traditional polyurethane foam; absorbs fewer low frequencies due to its thin profile.
Safety, Risks, and Common Challenges
When selecting and mounting acoustic materials inside a home, users must evaluate structural hazards and chemical testing standards carefully.
-
The Low-Density Packaging Fraud: Many online sellers market cheap, featherweight packaging foam as certified “acoustic insulation.” True acoustic foam requires a specific open-cell density of 1.5 to 2.0 lbs/cu.ft. Cheap packaging foam is closed-cell; its smooth surface reflects vocal waves back into your room, doing absolutely nothing to stop echoes. Mitigation: Skip generic unbranded bulk deals and purchase from verified acoustic suppliers who publish independent lab results.
-
Failing the Fire-Retardant Safety Test: Standard commercial foam can act as a dangerous fuel source if caught in a residential room fire, producing thick, toxic smoke if it lacks proper chemical treatments. Mitigation: Ensure all purchased foam panels carry an explicit Class A or Class 1 Fire Rating verified under ASTM E84 testing rules.
-
Tearing Sheetrock During Future Removal: Applying high-strength liquid construction glues directly to raw drywall anchors foam permanently. Attempting to pull the panels down later will rip away large chunks of underlying paper and plaster, ruining your walls. Mitigation: Mount panels using gentle painter’s tape layers, push T-pins through the edges, or stick panels onto portable corrugated plastic backing boards.
-
Over-Treating the Entire Workspace: Lining 100% of an office room with foam absorbs all high-frequency sounds completely, turning the space into an uncomfortably dead, oppressive environment known as an acoustic vacuum. Mitigation: Aim to cover between 20% and 35% of a standard office room’s bare wall surface area, leaving some bare zones to keep room speech sounding natural.
Ongoing System Maintenance and Long-Term Management
Sustaining a pristine, healthy working environment requires regular care, as porous materials can slowly trap airborne dust and debris over time.
Acoustic Panel Maintenance Checklist
-
Monthly Vacuum Cleaning: Use a soft brush attachment on a low-suction vacuum cleaner to gently clear dust from foam ridges; trapped dust clogs open pores and lowers absorption power.
-
Sunlight Path Assessment: Inspect panels for signs of crumbling or fading; move any panels sitting in the direct path of scorching summer window heat to preserve the foam’s shape.
-
Adhesive Stability Check: Verify that corner bass traps remain firmly anchored, preventing heavy blocks from shifting or dropping onto your equipment.
-
Annual Performance Re-Checks: Spend 30 seconds inside your app’s audio preview window once a year to confirm your vocal line prints clean, crisp, and completely clear of hollow room echo.
Tracking and Documenting Room Calibration Outcomes
Because human hearing adjusts quickly to ambient sound changes, keeping a brief written log before and after mounting panels helps confirm your updates are delivering clear audio benefits.
Tips for Keeping an Acoustic Log
Keep a basic text document on your desktop. Write down your installation dates, the exact model names used, your total wall coverage percentages, and direct feedback from colleagues regarding your microphone clarity.
Real-World Progress Records
-
Example 1 (Uncalibrated Initial Status Log): “March 11, 2026: Working from an empty spare bedroom. Drywall walls completely bare. Colleagues on Zoom reported a heavy, hollow echo, stating my voice sounds distant or underwater. Hard to stay focused during long meetings due to room echo. Room status: Untreated.”
-
Example 2 (Post-Panel Installation Log): “April 2, 2026: Mounted a 24-pack of Class 1 fire-rated 2-inch wedge foam tiles across first-reflection points at ear height. Coworkers reported complete elimination of room echo. Audio prints exceptionally crisp, clean, and professional. Focus remains high throughout long shifts.”
Frequently Asked Questions (FAQ)
1. Will acoustic foam panels stop the sound of a barking dog in the next room?
No. Acoustic foam panels are designed exclusively for sound absorption inside a room, meaning they stop your own voice from echoing off bare walls. They have almost zero physical mass and cannot block external sounds like barking dogs, loud traffic, or family members talking in the next room. Stopping outside noise requires soundproofing tools like solid-core doors, dense rubber gaskets, or thick mass-loaded vinyl sheets.
2. Can I wash my acoustic foam panels if they accumulate household dust?
You should never submerge polyurethane acoustic foam panels in water or run them through a washing machine, as moisture can trap mold inside the tiny open cells and cause the delicate foam matrix to degrade or crumble. The safest way to clean your panels is to use a soft brush attachment on a vacuum cleaner once a month to gently lift away surface dust.
3. How do I find the “first reflection points” on my office walls?
A simple way to find your first reflection points is the “mirror trick.” Sit in your normal office chair and have a family member slide a small mirror flat along the side wall at eye height. The exact spot on the drywall where you can see your monitor screen or face reflected in the mirror is your first reflection point, marking the perfect zone to mount your acoustic foam panels.
Closing Summary
Optimizing a home workspace requires separating the physics of noise blocking from the principles of room echo absorption. While structural renovations are required to stop outside noises, using the best acoustic foam panels for home office soundproofing needs is a highly efficient way to eliminate internal room reflections and hollow echoes. By choosing high-density, Class 1 fire-rated open-cell panels and placing them over 20% to 35% of your bare wall space at ear level, you can instantly turn an echoey room into a quiet, comfortable, and highly professional workspace over the long term.