Minimalist Desk Setup Cable Management Ideas and Solutions
The modern workspace has increasingly moved toward minimalist design principles, prioritizing clean lines, open surfaces, and the removal of visual clutter. While a simplified desk setup can improve mental clarity and reduce cognitive distractions, it presents a substantial technical challenge: handling the various power, display, and peripheral cables required by modern hardware. When left unmanaged, a tangle of loose cords under or on a desk not only ruins the clean aesthetic but also creates physical hazards, traps dust, and makes it difficult to troubleshoot or swap out hardware components safely.
Establishing a systematic approach to routing, hiding, and organizing wires is essential for building a functional and aesthetically pleasing office space. Utilizing structured minimalist desk setup cable management ideas and solutions ensures that necessary power grids and data lines remain completely hidden from view without sacrificing hardware performance or safety. This comprehensive guide breaks down the underlying principles of cable routing physics, compares the primary containment tools, provides step-by-step installation scenarios for different desk layouts, and establishes long-term best practices to maintain a clean workspace.
Overview of Minimalist Desk Setup Cable Management Ideas and Solutions
To successfully implement minimalist desk setup cable management ideas and solutions, one must look at cable organization as a structural routing system. The primary concept relies on the principle of central consolidation and architectural masking. Instead of allowing individual wires to drop loosely from monitors, computers, and chargers straight to the floor, cables should be routed along hidden structural channels directly built into or attached to the underside of the work surface. By keeping wires tucked tightly against the desk frame, you remove them from your direct line of sight.
When professionals plan out a clean workspace, their core objective is to reduce the “visible wire count” down to zero, or as close to it as possible. People commonly achieve this by grouping multiple power cables into a single high-capacity under-desk power strip, running data lines down the back of mechanical monitor arms, and routing the final main power drop down the inside of a desk leg. The expected outcome is a highly organized workspace that is easy to vacuum, shields delicate plugs from accidental foot kicks, and provides a calm, clutter-free environment that supports focused daily work.
Primary Categories of Management Systems
Hiding and organizing cables can be approached through several hardware and routing design methods, depending on your desk type and how often you change your gear setup.
Cable Management Modality Comparison
| Category / Type | Description | Common Use Case | Time / Cost / Effort Level |
| Under-Desk Undermount Trays | Open steel wire or solid metal baskets screwed beneath the desk surface to hold power bricks and strips. | Standard fixed-height wood desks holding multiple monitors and heavy chargers. | Low to moderate cost; 30–45 minute setup; moderate installation effort. |
| Magnetic Track Channels | Steel rails or magnetic clips that clamp directly onto metal desk legs or frames without screws. | Steel-frame modular desks or users who want to re-route cables quickly without tools. | Moderate cost; immediate execution time; lowest manual effort. |
| Flexible Spine/Sleeve Wraps | Zippered neoprene tubes or segmented plastic spines that group loose dropping wires into a single column. | Height-adjustable sit-stand desks where cables must expand and flex safely. | Budget-friendly; fast installation; low manual effort. |
| Grommet Routing Plugs | Plastic or metal caps placed over pre-drilled holes in the desktop to drop wires straight down. | Heavy desktop setups with wired keyboards, mice, and desk pads. | Low cost; requires drilling if holes are missing; moderate effort. |
Choosing between these categories depends on your furniture materials and how frequently you swap out your tech accessories. For permanent setups where the hardware rarely changes, under-desk undermount trays provide a high-capacity warehouse to securely tuck away large power adapters and multi-plug strips out of sight. If you run a dynamic setup where you constantly plug in different laptops, test devices, or cameras, using magnetic track channels or flexible sleeves allows for quick adjustments without needing to crawl under the desk to undo tight plastic ties.
Practical Layout Scenarios and Structural Applications
The way you hide your wires changes depending on the structural design of your desk and the mobility requirements of your hardware. Below are three common real-world scenarios.
Scenario 1: The Dual-Monitor Motorized Sit-Stand Desk
This layout involves a dynamic standing desk that moves up and down continuously throughout the day, requiring cables to flex smoothly without pulling loose or catching on surrounding furniture.
-
Actionable Layout Steps:
-
Mount a heavy-duty power strip directly to the underside of the moving desktop using structural wood screws.
-
Route all monitor display cords and desk accessory cables into an under-desk horizontal mesh tray.
-
Plug all devices straight into the moving under-desk power strip, ensuring no individual device cords hang down to the floor.
-
Route the single main power cord from the under-desk strip down to the floor outlet through a segmented, flexible plastic cable spine block.
-
-
Why Relevant: By placing the main power strip underneath the moving surface, device cables remain completely stationary relative to the desk frame during movement. The flexible spine protects the single dropping wall cord, ensuring it has enough slack to stretch safely to its full height without snapping or pulling out of the socket.
Scenario 2: The Ultra-Minimalist Floating Leg Desk
This environment features a very thin, modern desk with open metal legs placed in the middle of a room, where there are no back walls to hide loose cables.
-
Actionable Layout Steps:
-
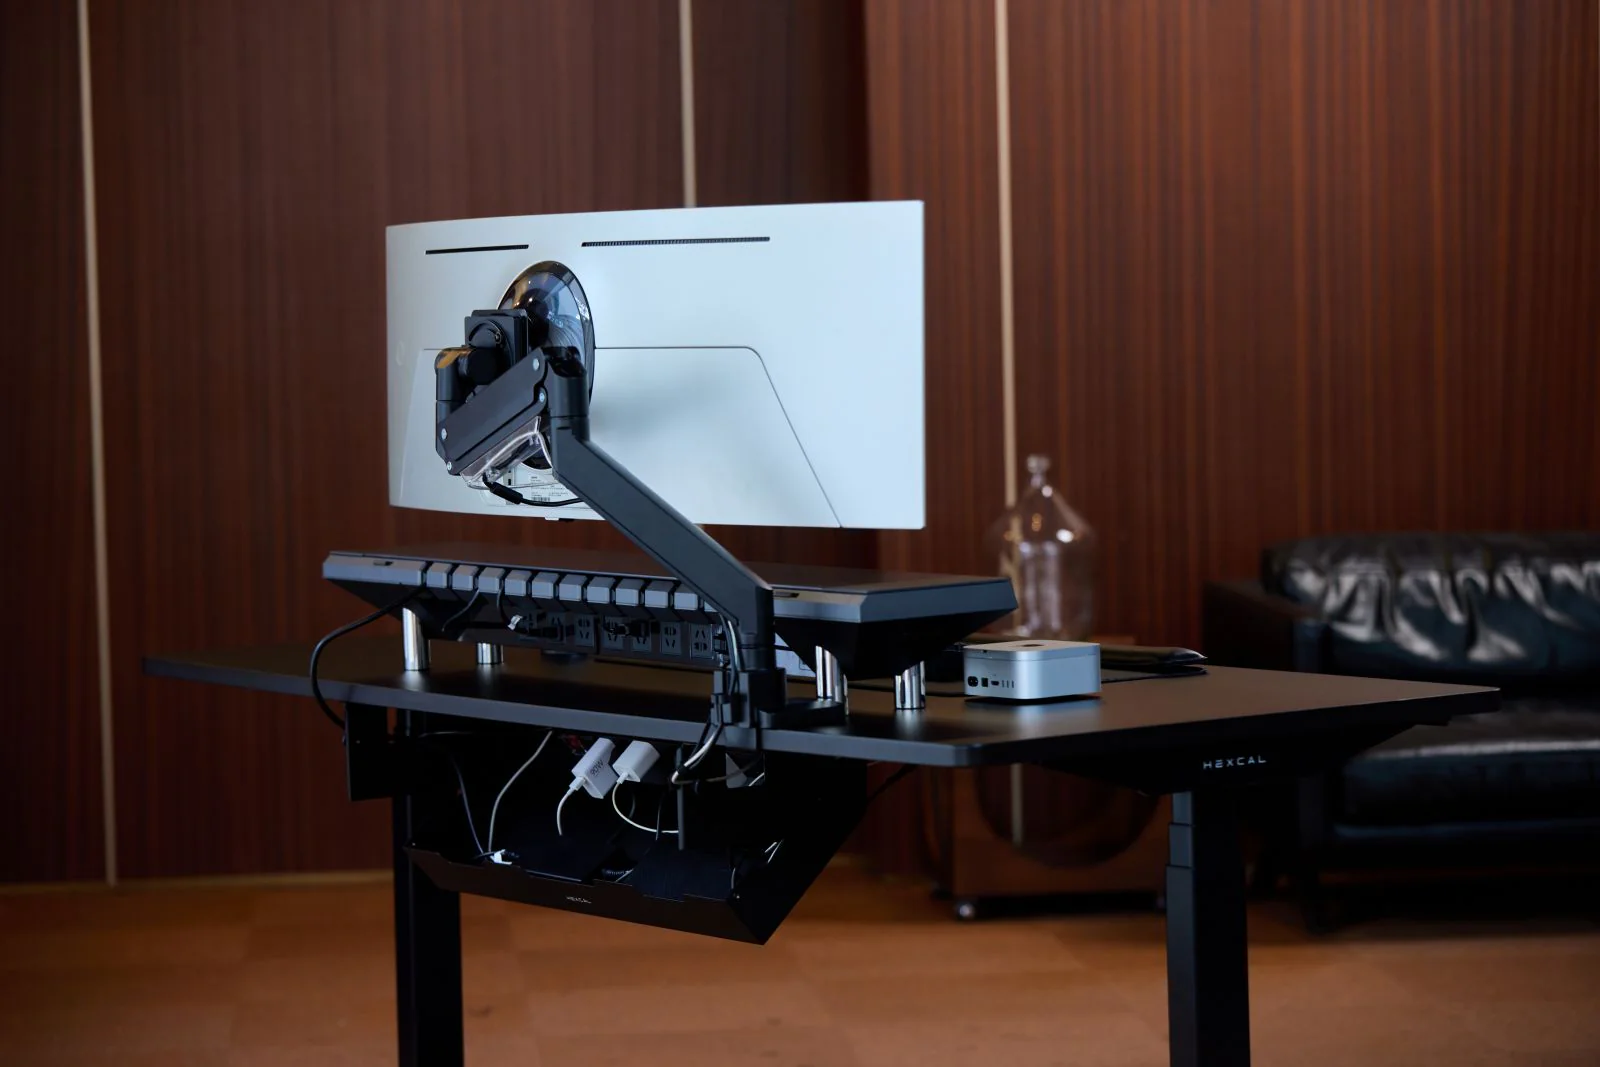
Mount a slim, solid steel cable box directly to the rear underside lip of the wood desktop.
-
Gather all device wires and group them tightly using reusable fabric hook-and-loop wrap straps.
-
Adhere strong magnetic cable clamps along the rear interior face of one steel desk leg.
-
Route the combined power cord bundle down the back of the metal leg, keeping it completely hidden from front view.
-
-
Why Relevant: When a desk is exposed on all sides, standard dangling wires ruin the minimalist look immediately. Running the consolidated cord bundle down the inner profile of a single leg mask the cables behind the existing structural metal lines of the furniture.
Scenario 3: The Multi-Device Remote Laptop Station
A remote professional uses a clean home office desk to switch between a main corporate laptop, a personal tablet, external backup drives, and smartphone charging docks.
-
Actionable Layout Steps:
-
Install an under-desk storage tray paired with a desktop silicone cable organizer slot block near the back edge.
-
Route charging heads (USB-C, Lightning) up through a rear desktop grommet hole or back edge gap, locking them into the silicone slots.
-
Store all bulky external hard drives and AC power blocks permanently inside the lower under-desk basket tray.
-
Pull up only the single charging line needed at any moment, keeping unused cables retracted out of sight.
-
-
Why Relevant: This setup prevents desktop clutter by anchoring loose charging heads in one neat row, stopping them from sliding off the back of the desk when unplugged and keeping the main work surface entirely clear.
Contextual Comparison
These three scenarios differ based on their physical movement and layout exposure. Scenario 1 solves the mechanical safety challenge of variable vertical heights. Scenario 2 utilizes existing structural shapes (the desk legs) to hide cables in open, high-visibility rooms. Scenario 3 prioritizes quick daily access, using desktop anchors to manage multiple changing charging lines, showing that finding the best minimalist desk setup cable management ideas and solutions requires matching the containment method to your daily workflow.
Strategic Planning, Tools, and Budget Allocation
Managing cables successfully depends on planning your layout before buying accessories. Purchasing various plastic clips or adhesive ties without measuring your cable lengths and power brick sizes can leave you with a messy, overloaded setup. Mapping out your layout and gathering your tools first ensures you buy the right management pieces for your hardware.
Cable Management Component Budget Model
| Category | Estimated Amount / Effort | Explanation | Optimization Tips |
| Primary Containment | $25 – $60 / Moderate Effort | Steel wire baskets, mesh nets, or solid under-desk trays to hold heavy power bricks. | Choose a tray that opens or tilts downward easily so you can plug in new items without unscrewing the whole frame. |
| Bundling Materials | $10 – $20 / Low Effort | Reusable fabric hook-and-loop (Velcro) straps and expandable braided split sleeves. | Avoid permanent plastic zip ties; fabric straps are reusable and let you swap out broken cords easily without cutting. |
| Anchoring Fasteners | $15 – $30 / Low Effort | Adhesive backed cable clips, magnetic blocks, and under-desk screw-in routing rings. | Clean the underside of your desk with rubbing alcohol before applying adhesive pads to ensure a strong, long-lasting bond. |
| Power Infrastructure | $25 – $50 / Low Effort | High-quality multi-outlet surge protector strips featuring wide spacing for large plug blocks. | Select a surge protector with a flat, angled wall plug to keep your wall outlet profile clean and hidden behind baseboards. |
Note: The price ranges and component configurations listed in this matrix serve as general market examples and can fluctuate based on your local retail options, chosen material types, and specific desk dimensions.
Core Management Accessories and Implementation Methods
Several specialized tools and hardware choices can help professionals organize their workspace cables neatly and securely.
1. Braided Expandable Sleeves
Flexible tubes made of lightweight polyethylene fabric that warp around multiple loose wires to compress them into a single clean line.
-
Advantages: Instantly groups multiple messy monitor and power cables into one clean, sleek visual bundle; highly resistant to fraying.
-
Disadvantages: Requires threading cables through the tube manually during initial assembly, which can be tedious for long runs.
2. Under-Desk Mesh Net Organizers
Heavy-duty fabric or nylon nets that mount underneath the desk using small screw hooks to cradle large bundles of wires.
-
Advantages: Extremely lightweight and flexible; easily expands to hold oversized, awkward laptop charging bricks; sags less than cheap plastic rails.
-
Disadvantages: Can look slightly less neat than solid steel covers if overloaded with loose, unbundled wires.
3. Silicone Desktop Cable Anchors
Small, flexible rubber blocks backed with adhesive that stick to the edge of a desk, featuring individual slots to grip loose cords.
-
Advantages: Stops charging lines from sliding off the back of the desk when unplugged; keeps frequently used heads right at your fingertips.
-
Disadvantages: Keeps a small footprint visible on the clean desktop surface; adhesive backings can weaken over time if pulled hard.
4. Adhesive Hook-and-Loop Roll Straps
Continuous rolls of double-sided fabric fastening tape that can be cut with standard scissors to any custom length.
-
Advantages: The single most useful tool for cable organization; completely reusable; wraps tightly around bundles without pinching or damaging delicate insulation.
-
Disadvantages: Collects airborne dust and lint over time, which can slowly weaken the fabric grip after years of open exposure.
Safety Risks, Mechanical Hazards, and Routing Mistakes
Organizing an electrical workspace requires careful attention to weight limits and bending safety to avoid creating hidden technical faults or fire hazards.
-
Creating “Drip Loops” Neglect: When running a power cable straight from a desk down to a wall outlet, liquid from an accidental desk spill can travel straight down the wire into the electrical socket. Mitigation: Always route your wires with a small, intentional downward loop (a drip loop) below the level of the wall plug, forcing any liquid to safely drip onto the floor before reaching the live wall outlet.
-
Bending Fiber or Display Cords Too Sharply: Pulling data lines (like optical lines or DisplayPort cables) around sharp metal desk corners kinks the internal glass or copper strands, causing signal drops or broken ports. Mitigation: Maintain a safe, gentle bending radius of at least 1 to 2 inches for all data and video lines, utilizing curved routing loops instead of hard creases.
-
Daisy-Chaining Multiple Surge Protectors: Powering a heavy desk setup by plugging one cheap extension strip into another creates a serious electrical fire hazard that can easily trip breakers or overheat lines. Mitigation: Use a single, heavy-duty commercial surge protector fitted with 10 to 12 wide-spaced outlets to handle your entire workspace load safely from one wall wall drop.
-
Tying Cables Too Tightly on Sit-Stand Desks: Forgetting to test your cable slack before raising an adjustable desk can rip device ports out or break internal wire copper. Mitigation: Always raise your adjustable desk to its absolute maximum standing height before anchoring or strapping down the lower cord bundles to ensure the lines have plenty of loose slack through their full path.
Long-Term Maintenance and System Upkeep
Sustaining a pristine, minimalist office setup requires continuous habit checks, as new devices and everyday shifting can slowly pull your neat wiring layout out of alignment.
Ongoing Workspace Calibration Checklist
-
Every Sunday Shift: Wipe down your under-desk trays and cable sleeves with a microfiber duster; hidden wire bundles can act as massive dust traps over time.
-
Every Six Months: Inspect adhesive backed plastic clips under the desk to ensure heat from warm charging bricks hasn’t caused the glue to slide or peel away.
-
Hardware Swap Upkeep: When adding a new peripheral (like a webcam or desk lamp), take an extra 5 minutes to route the cord through your existing sleeves rather than tossing it loosely behind the monitor.
-
Piston Line Slack Check: For standing desks, cycle the desk from lowest to highest once a month to verify that no wires have shifted into positions where they could get pinched inside the metal leg frame joints.
Documenting and Mapping Workstation Layouts
When building out complex technical desk setups, keeping a basic record of your cable routing connections simplifies future troubleshooting or hardware upgrades significantly.
Tips for Organizing Workspace Wire Maps
Create a brief text note or simple diagram on your computer mapping out which devices plug into which specific ports on your under-desk power strip or monitor hub. Group your cables by color or label the ends with small flags of colored tape.
Illustrative Structural Layout Records
-
Example 1 (Minimalist Laptop Setup Log): “Workstation Map: Under-desk basket holds primary 10-outlet surge strip and dual laptop charging blocks. Main power drop routed down Left Desk Leg inside a magnetic steel channel. Desktop access restricted to two silicone-anchored USB-C charging lines rising through the rear center grommet hole.”
-
Example 2 (Advanced Desktop Power Map): “Hardware Configuration: Dual 27-inch screens mounted on a central dual monitor arm. Video and power lines bundled cleanly inside an expandable braided sleeve running down the arm spine. All equipment terminates inside a hidden steel wire tray. Main wall link protected with a 15-foot heavy-duty 14AWG cord with built-in drip loops.”
Frequently Asked Questions (FAQ)
1. Should I use plastic zip ties or fabric hook-and-loop straps to bundle my desk cables?
Always prioritize fabric hook-and-loop (Velcro) straps over permanent plastic zip ties for office desks. Plastic zip ties clamp down with rigid force, which can easily crimp or slice through delicate device wires if pulled tight. Furthermore, every time you swap out a keyboard, mouse, or screen, you have to use scissors to cut old zip ties off, risking cutting your power lines. Fabric straps are completely reusable and adjustable.
2. How do I hide the big, bulky power adapter bricks that come with laptops and monitors?
The most effective way to hide large power blocks is to move them completely off the floor and off the desktop by installing an under-desk wire basket or mesh tray. Mount the tray to the rear underside of your wood desktop using small screws, then secure the heavy power bricks inside the tray using fabric straps to keep them from sliding around when you move the desk.
3. What can I do to keep my cables hidden if my desk is pushed completely flat against a wall?
If your desk sits tight against a wall, avoid squeezing thick cables straight down the back, as this can crush the plugs and scuff your baseboards. Instead, pull the desk away from the wall by just half an inch to create a safe channel, or install a desk surface fitted with a built-in rear scalloped cutout or a drop-through grommet hole to route wires straight down underneath the workspace.
Closing Summary
In conclusion, successfully executing minimalist desk setup cable management ideas and solutions depends on consolidating loose wires into a single clean system and using your desk’s structural lines to mask them out of sight. By mounting heavy power strips and charging bricks securely inside under-desk trays and routing consolidated cord bundles down the inner profiles of your desk legs, you can easily remove the visual mess that causes daily distractions. Combining these smart layout systems with regular maintenance ensures a clean, safe, and highly productive workspace over the long term.